As an Amazon Associate, we earn from qualifying purchases. Some links on this site are affiliate links at no extra cost to you. Our recommendations are based on thorough research and editorial judgment.

Designing a One-Page Emergency Plan You Can Print and Tape to the Wall
Have you ever thought about what you’d do in an emergency? It can be overwhelming, but having a plan helps.
You may be interested


I’ve designed a one-page emergency plan for my home, and I want to share how you can make one, too.
Start by listing key emergency contacts. This includes family, neighbors, and any local emergency services.
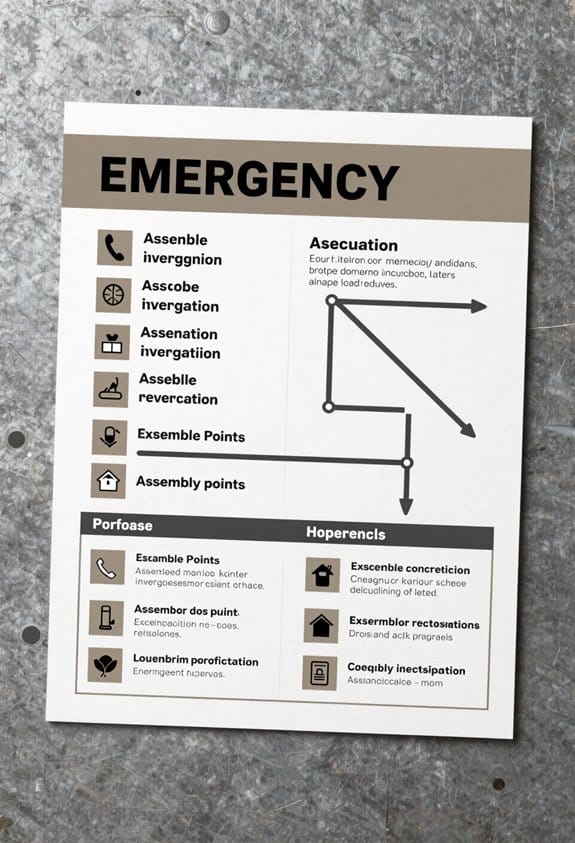
Next, clearly outline evacuation routes. Use simple diagrams or arrows to mark these paths. It’s important to have designated assembly points at least 200 feet away from your home—safety first!
To make everything easy to read, use large fonts. Color coding is a great trick, too; different colors for contacts, routes, and assembly points can help in a pinch.
If someone in your household has special needs, highlight accessible routes and assign a buddy for assistance.
Where should you stick this plan? I recommend placing it in a spot everyone will see, like the refrigerator or your front entrance. Out of sight means out of mind, right?
And don’t forget to update your plan at least once a year or whenever something important changes.
Taking these steps ensures that you and your family can act quickly and confidently when it matters most. It’s all about being prepared and giving yourselves the best chance in a tough situation.
So, why wait? Get started on your emergency plan today!
Key Takeaways
- Include essential emergency contacts, evacuation routes, and designated meeting spots for quick reference on a single page.
- Use big fonts, simple icons, and color coding to ensure clarity and easy navigation at a glance.
- Address special needs by incorporating mobility, medical, and communication considerations in the plan.
- Print on durable, weather-resistant material and place in high-visibility locations like near entrances or common areas.
- Regularly review, update, and conduct drills to keep the plan current and well-practiced by all household members.
What Is a One-Page Emergency Plan and Why Create One
Emergencies can hit us like a brick wall when we least expect it. This is why having a one-page emergency plan is an absolute must. It’s a lifesaver, literally. Think about it: when chaos erupts, you don’t want to waste precious moments searching for important information.
A good emergency plan is straightforward and covers the essentials. Here’s what to include:
- Emergency Contact Numbers: List key phone numbers for family, friends, and local services.
- Evacuation Routes: Clearly mark how to get out of your home quickly and safely.
- Designated Meeting Spots: Decide where your family will regroup after evacuating.
Now, don’t forget the unique needs of your household. If anyone has medical alerts or mobility challenges, make sure that these elements are also highlighted in your plan. This ensures everyone is accounted for and no one is left behind.
Printing this plan is just the first step. It should be placed where everyone can see it—maybe the fridge door or a bulletin board. When it’s visible, everyone stays aware of what’s needed. A neat, well-structured layout means less confusion and a much quicker response when you’re in a hurry.
To wrap it up, a one-page emergency plan isn’t just a piece of paper. It’s a vital tool that fosters readiness and safety. So, take a moment to create your plan, print it out, and keep your family safe. Trust me—it’s worth the effort! Including it alongside a car emergency bag can greatly increase your preparedness for unexpected situations on the road.
Identifying Emergency Risks for Your Household

Preparing for emergencies can feel overwhelming, especially when we don’t fully grasp the risks lurking around our homes. But here’s a straightforward way to tackle it. Start by looking at the common hazards in your area. Think floods, earthquakes, fires, and severe storms. What’s typical for your neck of the woods?
Next, zoom in on your home’s specific vulnerabilities. Is it near a fault line or in a flood zone? Knowing this helps us zero in on what safety measures we should prioritize when crafting our emergency plan.
You might wonder how personal factors play into all of this. Well, it’s essential to consider everyone in the household. Do you have family members with disabilities or medical conditions? Ensuring your emergency plan caters to their needs is crucial.
Don’t forget, plans aren’t a one-and-done deal. Make it a habit to review and update your plan regularly. Life changes—new family members, changes in living situations—so it’s smart to keep everything fresh.
And let’s not overlook the power of teamwork. Involve everyone in your home in discussions about the plan and run practice drills. Building awareness together can make all the difference when it counts.
In the end, identifying risks doesn’t just make your plan more practical; it makes it effective. So take that first step—assess, prepare, and stay safe. You’ve got this! Remember to include an adequate water supply as part of your emergency preparedness essentials to ensure survival during crises.
Essential Emergency Contacts and Communication Methods

When an emergency hits, time is precious, and having a solid plan can make all the difference. It’s crazy how often we don’t think about these things until it’s too late. Picture this: the power goes out, or something worse happens. Who do you call? That’s why a well-organized list of essential contacts is vital.
Here’s how to set it up:
- Local Emergency Services: Have numbers saved for police, fire, and ambulance right at your fingertips.
- Poison Control: Talk about a lifesaver! Make sure you have that number handy.
- Family and Friends: Keep a few key relatives on speed dial. Write down their numbers in a way that’s easy to read.
Don’t forget to choose both primary and secondary contacts responsible for keeping communication flowing among everyone in your household. You might wonder how to keep everyone informed during a crisis. A good tip? Enroll in local emergency alert systems. Staying updated is crucial!
Let’s talk communication devices for a moment. Mobile phones are a must, but having two-way radios can be a smart backup. If everything goes offline, you need a plan that won’t leave you stranded. Practice makes perfect, so run those drills regularly! Ensure everyone knows how to reach out and what to do if your plan goes sideways.
Also, ensure that anyone involved in emergency response wears proper electrical hazard protection footwear to maintain safety in environments where electrical risks are present.
The bottom line? A little preparation can improve your response when every second counts. Take the time to get organized, and you’ll feel more confident when an emergency strikes. Stay safe and keep those lines of communication open!
Recommended Products

Rapid POC Communication – Unlimited Range Nationwide The G09 utilizes rapid 4G LTE POC technology, providing unlimited range communication nationwide. Ideal for logistics, security, and emergency teams, it delivers clear, instant communication without the need for traditional radio infrastructure.(FCC:2AN96PO25702)

【Global Walkie Talkie Unlimited Range】Cellular POC ptt walkie talkies technology for seamless rapid unlimited range coverage —whether 50 miles,100 miles,500 miles,1000 miles or even 10,000 miles apart. The 4g lte SIM card is pre-inserted for you.Just unbox, power on, and enjoy crystal clear instant rapid communication across California to New York, cities, states, and countries. Connectivity relies on robust nationwide cellular towers for reliable coverage. FCC ID: 2BK59-M12
【Nationwide Walkie Talkie】Cellular POC ptt-walkie talkies technology for seamless unlimited range coverage.The 4g lte SIM card is pre-inserted for you.Just unbox,power on, and enjoy crystal clear instant rapid communication across California to New York,cities, states,and countries.Connectivity relies on robust nationwide cellular towers for reliable coverage.FCC ID: 2BK59-M12
Evacuation Routes and Shelter Locations for Your Plan
When emergencies strike, having a solid plan is a must. Seriously, clear evacuation routes and shelter spots are crucial. I’ve learned from experience that it’s all about knowing the quickest and safest paths to safety.
Here’s how to set it up:
- Identify primary evacuation routes. These are your main paths to safety.
- Don’t forget alternative routes. They help avoid confusion if a main path is blocked.
- Mark these routes clearly. Use signs and possibly even colored tape to guide the way.
Next, think about shelter locations. Designate at least two along your routes. Accessibility matters, so ensure these shelters are easy to reach, especially for those with disabilities. Regularly checking these pathways keeps them clear, making movement fast and safe.
Let’s talk visuals. A printed map showcasing all these routes and shelters can be a lifesaver. Tape it up where everyone can see it. And don’t just stop there—run drills. Practicing these routes boosts confidence and readiness. Also, wearing comfortable and durable footwear can significantly improve safety during evacuation by providing better protection and slip resistance.
Recommended Products

DURABLE: The frame is made of durable plastic and has a clear plastic in the center. The text on the frame glows in the dark.

3M AUTHORIZED. Authorized signs are certified to the 3M Matched Component System. This assures that signs are durable outside.

3M AUTHORIZED. Official 3M reflective films and inks on durable, rustproof aluminum ensure that our signs meet all DOT requirements for outdoor parking and traffic signs.
Safe Assembly Point Selection and Marking
When it comes to emergencies, getting everyone out of a building quickly is step one. But what happens after? That’s where choosing a safe assembly point becomes crucial. Picture this: people are rushing out, and they need a secure area to gather and get organized.
So, how do you pick the right spot? Here’s a simple checklist:
- Distance: Aim for at least 200 feet away from the building. This keeps everyone safe from any potential hazards.
- Accessibility: Make sure it’s easy for everyone to reach, no matter their mobility.
- Clear Space: Keep the area free of obstacles. This ensures a smooth gathering without any risks.
Managing that space is key, too. Regularly check for any debris or blockages that could cause problems. Now, let’s chat about signage. It’s not enough to just have a sign. You want ones that are easy to see from various angles and well-lit, especially if an emergency happens at night. This clarity helps keep everyone calm and focused.
Don’t just set it and forget it. Make it a point to communicate where the assembly spot is during training and drills. It’s all about repetition, helping everyone feel confident they know where to go.
In the end, having a reliable assembly point sets the stage for safety and accountability after an evacuation. So, take the time to get it right. It’s a small effort that can make a big difference in a stressful time. Consider keeping essential gear in a 72-hour backpack nearby to support immediate needs after assembling.
Recommended Products

𝗗𝗨𝗥𝗔𝗕𝗟𝗘 𝗦𝗧𝗘𝗘𝗟 𝗖𝗢𝗡𝗦𝗧𝗥𝗨𝗖𝗧𝗜𝗢𝗡 – Made from high-quality 1” (2.5 cm) diameter, 0.078-gauge steel tubing with a durable powder-coated safety yellow finish for maximum visibility and jobsite safety

⭐ Top Rated Red LED Emergency Exit Sign with Adjustable Lights

Universal Voltage & 90 Mins Duration: Supporting 100-300V universal voltage, compatible with both commercial and residential use. Equipped with NiCd backup batteries that provide over 90 minutes of illumination during power outages. Two adjustable LED light heads allow the led exit lights to be pointed in any direction needed.
Addressing Special Needs in Your Emergency Plan
Disasters can strike at any moment, and when they do, we all want to ensure that everyone is safe. But what about those who need a bit more help? Planning for their unique needs is crucial.
To start, think about mobility. Are there obstacles that could block an escape route? Make sure evacuation paths are not only accessible but also clearly marked so everyone knows where to go.
Next up is communication. How do you relay important information to everyone in your household? That might mean putting up visual alerts for those who can’t hear well and having clear instructions ready for folks with visual impairments.
Let’s also talk about support. Assign roles to specific people who will assist those with special needs. Having designated helpers can make a world of difference when time is tight.
Don’t forget the medical side of things. Pack necessary medical supplies, plus any assistive devices, like wheelchairs or inhalers, that someone might need. Making sure these items are ready to go can really ease stress during an emergency. Including a comprehensive first aid kit with essential emergency supplies tailored to various needs can greatly improve safety and response.
Recommended Products

Ultra-Reinforced Aerospace Frame Constructed from precision-welded 6061 aerospace-grade aluminum alloy, the Ranger Beast delivers exceptional structural integrity while maintaining optimized weight efficiency. Advanced heat-treatment processes enhance tensile strength and long-term durability for demanding, heavy-duty use.

EASY FOLD DESIGN: Quickly folds and locks into a compact position for hassle-free transport and storage, making it ideal for travel.

Reclining Function: Enjoy comfort whether you're driving or relaxing with the Ranger Reclining Power Wheelchair. It features an infinitely adjustable backrest that allows you to set the angle from fully upright to a deep recline.
Design Tips for a Clear and Easy-to-Use Plan
Emergencies can hit when we least expect them. That’s why having a solid plan is crucial. You want it to be simple and straightforward, so anyone can follow it without confusion, even in high-stress moments.
Start by using big, clear fonts and simple icons. This will guide the eye and help people find what they need quickly. You should also think about color coding. For example, red can signal fire, while blue can represent natural disasters. This instant recognition can make all the difference.
Organizing information is key. Use distinct sections for evacuation routes, assembly points, and contact details. Keeping these elements separate and logically arranged prevents confusion when it counts. To boost understanding further, incorporate arrows and symbols. This way, even those with varying literacy levels can grasp the instructions.
Keep the format standard, like A4 or letter size. This makes it easy to print and tape up in prominent locations without losing important details.
Also, consider including details about emergency evacuation bags to ensure everyone knows where key supplies are stored and what essentials to grab.
In short, a well-designed emergency plan prioritizes clarity and usability. Take these tips to heart, and you’ll help ensure that everyone knows exactly what to do when it matters most. Don’t wait—get started on your plan today!
Where to Place Your Plan and When to Update It
Imagine this: a crisis hits, and panic sets in. If everyone doesn’t know where to find the emergency plan, that can lead to chaos. To avoid that, put your plan in places where it’s easy to spot. Think high-visibility spots.
- Near the main entrance
- In break rooms
- Common areas
These locations ensure everyone can see them when swift action is vital. And don’t forget—print your plan on weather-resistant material. It’ll stay legible even in nasty conditions.
You might be wondering how often you should update this plan. Here’s the scoop: review it at least once a year or whenever significant changes happen. That could include new staff members or updates to policies. Always mark the last update date directly on the document to keep things clear.
Regular drills and training are key. They help ensure everyone knows where the plan is and what it entails.
To sum it up, strategic placement and timely updates keep your emergency plan relevant and ready to roll when you need it most. So, take the time now to make your plan easily accessible and well-maintained—you’ll be glad you did when it matters. Incorporating slip resistance strategies in your workspace can also enhance overall safety during emergencies.
Frequently Asked Questions
How Often Should I Practice My Emergency Plan With My Family?
We should schedule family drills frequency at least twice a year to keep everyone sharp. Regular emergency plan review helps us stay prepared, and practicing communication strategies guarantees we all know what to do when it counts most.
Can I Include Pets in My One-Page Emergency Plan?
Absolutely, including our animals is essential! We should specify pet evacuation routes, pack emergency pet supplies, and add clear animal care instructions. That way, we’re prepared to protect and provide for every family member.
What Supplies Should I Keep With My Emergency Plan?
We should keep an emergency supplies checklist, essential documents storage, and a first aid kit with our plan. This keeps everything organized and accessible, ensuring we’re ready and confident during any emergency situation that arises.
How Do I Handle Emergency Plans for Multi-Story Homes?
It is understood 60% of home fires occur in multi-story houses, so we should map clear evacuation routes, emphasize stairwell safety, and list emergency contacts prominently to make sure everyone can exit safely and communicate quickly during emergencies.
Should I Create Separate Plans for Different Types of Emergencies?
Yes, we should create plans for specific scenarios, focusing on different emergency types and their response strategies. This helps us stay organized and guarantees we act quickly and correctly no matter what emergency arises.


