As an Amazon Associate, we earn from qualifying purchases. Some links on this site are affiliate links at no extra cost to you. Our recommendations are based on thorough research and editorial judgment.

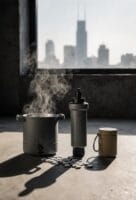
How to Disinfect Water When You Have Limited Fuel
When the fuel is running low, finding ways to disinfect water can feel daunting. I’ve been there, and I have a simple method that works like a charm using just plain unscented bleach. You want something that contains 6% to 8.25% sodium hypochlorite—no fancy scents or additives, please.
You may be interested


First off, if your water looks cloudy, give it a good filter. A clean cloth works wonders to strain out any particles.
Next, it’s time to add bleach. Here are your measurements:
- For clear water: Add 1/8 teaspoon of bleach per gallon.
- For cloudy water: Go with 1/4 teaspoon per gallon.
Mix it well! Then let it sit for about 30 minutes. You’ll know it’s good to go if you catch a whiff of that slight chlorine smell.
Now, don’t forget about storage! Use sanitized containers and seal them tightly. It’s key to keep that treated water safe until you need it.
This process can really save you when the situation gets tight. Just a few simple steps can give you peace of mind about the water you’re drinking.
You’ve got this!
Key Takeaways
- Use unscented household bleach (6%-8.25% sodium hypochlorite) to disinfect water without boiling.
- Filter cloudy water through a clean cloth before adding bleach for better disinfection.
- Add 1/8 tsp bleach per gallon for clear water, 1/4 tsp for cloudy water, then wait 30 minutes.
- Confirm disinfection by detecting a chlorine smell; repeat treatment if no chlorine odor is present.
- Store treated water in clean, sealed containers and label with the treatment date for safe use up to one week.
When to Skip Boiling and Disinfect Water With Bleach

Boiling water is a common go-to for disinfection, but what if you don’t have the fuel to make it happen? That’s when bleach comes to the rescue. Surprisingly, this household staple can effectively disinfect water without the heat.
Here’s the scoop on how to do it right:
- Choose the right bleach: Make sure it’s unscented household bleach.
- Measure carefully: Add 1/8 teaspoon per gallon of clear water. If the water looks cloudy, double that to 1/4 teaspoon.
- Let it sit: After adding the bleach, let the water sit for at least 30 minutes in a clean container. This step is crucial for effective disinfection.
- Check for chlorine smell: If you don’t catch a whiff of chlorine, add a bit more bleach for safety.
This method keeps your water safe for up to a week. Staying prepared with these tips can really save the day when boiling isn’t an option. Now you’re ready to tackle water safety with confidence—no heat required! For longer-term solutions and additional contaminant removal, consider portable systems with Berkey purification filters.
Preparing Water Before Disinfecting With Bleach

Water is the heart of any effective bleach disinfection process. Trust me, starting with clear, particle-free water makes all the difference. If your water isn’t clear, you’ll want to do a little prep. Just strain it through a clean cloth or a coffee filter to get rid of any visible particles. This simple step ensures that the bleach can do its job without any interference.
Choose a clean container for your water. It’s crucial to keep it free from any contaminants during treatment. Now, let’s talk about how much bleach to use. The amount really depends on the clarity of your water:
- For clear water: Add 1/8 teaspoon of bleach per gallon.
- For cloudy water: Go with 1/4 teaspoon per gallon.
Always opt for unscented household bleach that contains 6% to 8.25% sodium hypochlorite. Trust me, this makes for effective disinfection. Proper dosing and precise application are essential to ensure treatment effectiveness and safety when disinfecting water.
How to Use Household Bleach Safely to Disinfect Water

If you’ve ever found yourself in a pinch, needing clean water but only having some questionable stuff on hand, you’re not alone. The good news? Household bleach can save the day! Let’s get straight to it and break down how to safely disinfect water using bleach.
First off, make sure you grab regular, unscented liquid bleach. You want one that has between 6% and 8.25% sodium hypochlorite. That’s the magic ingredient that will do the heavy lifting in disinfecting water.
Before adding bleach, take a good look at the water. If it’s cloudy, you’ll need to filter it first. For clear water stored in clean containers, use just 1/8 teaspoon of bleach for every gallon. If it’s cloudy, bump that amount up to ¼ teaspoon.
Here’s how to do it:
- Mix it well.
- Let it sit for 30 minutes.
You’ll want to check for a slight smell of chlorine after that time. If there’s no odor at all, you might need to repeat the bleaching process and wait another 30 minutes.
Storing your treated water is crucial too. Make sure you keep it in clean, sanitized containers to ensure it stays safe for drinking. When working with bleach or any chemicals for disinfection, it’s important to employ breathability and comfort safety practices to minimize exposure to fumes.
Adjusting Bleach Dosage for Water Clarity and Volume
When you find yourself in a situation where you need to treat water—especially in emergencies—you want it to be done right. But how much bleach should you use? It all comes down to two key factors: the clarity of your water and how much you’ve got to treat.
For clear water, just a pinch goes a long way. Use 1/8 teaspoon of regular chlorine bleach per gallon. Cloudy or murky water? Step it up! You’ll need 1/4 teaspoon per gallon to ensure the disinfection process works effectively.
Here’s a simple step-by-step to get it right:
- Pour the recommended amount of bleach into a clean container with your water.
- Give it a good stir to mix it all together.
This approach maximizes the bleach’s effectiveness without wasting it. Stick to bleach that has 6% to 8.25% sodium hypochlorite for the best results.
Why does this matter? Proper dosing based on water clarity and volume is crucial. It not only kills harmful pathogens but also ensures you have clean, safe drinking water when it matters most. Keep these tips in mind next time you’re prepping! You’ve got this!
For long-term water storage, it is recommended to use specialized water treatment methods in addition to disinfection for maintaining potability.
Waiting and Testing Bleach-Disinfected Water
Ever found yourself unsure about the safety of your drinking water? Adding bleach is a solid way to make sure it’s clean, but there’s a right way to do it. After you toss in that bleach, wait at least 30 minutes. This time is crucial because it allows the bleach to do its job, killing off any nasty microorganisms.
If the water was cloudy, don’t skip a step. Strain it through a clean cloth before adding bleach. It’s also a good idea to use a bit more bleach than usual. That higher dose helps ensure everything gets disinfected well.
Now, once those 30 minutes are up, check for a chlorine smell. If you can’t smell any, don’t panic. Just add another dose of bleach and wait another 30 minutes. Trust me, this extra step gives you peace of mind that your water is safe to use.
Here’s a quick checklist to keep everything on track:
- Wait at least 30 minutes after adding bleach.
- Strain cloudy water before treatment.
- Use a higher bleach dose for more protection.
- Check for chlorine scent after waiting.
- If not detectable, add more bleach and wait again.
By following this waiting and testing process, you’re significantly lowering the risks posed by harmful germs. Ultimately, disinfected water should look clear and be stored in containers that are clean and sanitized.
Keep these tips in mind, and you’ll be a pro at ensuring your water is safe. Stay hydrated and safe! Including proper storage techniques for disinfected water can help maintain its safety over time.
Storing and Using Water Treated With Bleach
Have you ever wondered how to safely store water treated with bleach? After all, we all want our drinking water to be safe and healthy, especially during emergencies. Here’s the scoop: Once you’ve treated your water with bleach and ensured it’s disinfected, proper storage is key to keeping it safe.
- Use a clean, sanitized container. This step can’t be skipped. A dirty container can recontaminate your water.
- Seal it tightly. You want to keep anything from getting in there.
- Don’t forget to label it with the treatment date. This helps keep track of how long it’s been stored.
Surprisingly, water treated with sodium hypochlorite bleach is good for about a week. If you catch a whiff of chlorine, that’s a sign the bleach is doing its job. No smell? Time for a redo on your treatment and storage process.
If you’re concerned about taste, try this: Pour the water back and forth between two clean containers. This aeration trick can make a big difference. Just like disinfected water, boiled water also needs clean storage, so keep that in mind.
In emergency situations, the way we handle disinfected water really matters. Making sure we drink and use it safely can protect our health and keep us feeling good. So, remember to store it right and enjoy peace of mind with your freshly treated water! For longer-term and highly reliable solutions, consider using portable water purifiers that can remove viruses, bacteria, and other contaminants effectively.
Alternative Low-Fuel Ways to Make Water Safe
Finding safe drinking water can be tricky when your fuel supply is running low. Boiling is a trusted method, but it’s not always feasible. So what do you do?
Consider using household bleach. Just add 1/8 teaspoon per gallon of clear water or ¼ teaspoon for cloudy water. Let it sit for about 30 minutes—by then, a slight chlorine smell should be present, meaning it’s ready to drink.
You might also think about personal water filters. These handy tools don’t need any fuel. Just make sure they’re designed to filter out microorganisms—this is key! Collect your water in a clean container, and if you can, follow up the filtration with some chemical disinfection. Water disinfection tablets or granular calcium hypochlorite are excellent low-fuel options as well.
Rechargeable water purifiers that use advanced filtration systems can be a fuel-free alternative for ensuring water safety on the go.
If things get really tight, consider bottled water as a last resort.
Now, if you’re boiling water, be sure to keep it at a rolling boil for at least one minute to ensure it’s safe.
Stay safe and hydrated—there are always ways around fuel shortages!
Frequently Asked Questions
How to Disinfect Water in an Emergency?
In emergencies, we disinfect water using boiling water when possible, chemical treatments like bleach, solar disinfection, filtration methods, and DIY disinfectants from emergency supplies. Combining methods guarantees safer water when fuel or resources are limited.
Can You Make Stagnant Water Drinkable?
Like the dawn clearing night’s fog, we can transform stagnant water through filtration methods and sedimentation process. Using boiling techniques, chemical disinfectants, or solar purification, we make it safe—turning murky pools into pure streams for life.
How to Clean up Stagnant Water?
To clean stagnant water, we use filtering techniques like cloth or coffee filters, apply purification methods such as boiling or chemical treatments, source natural water carefully, and always follow safety precautions to make sure our water’s safe to drink.
How Do Preppers Purify Water?
We don’t just sip magically purified rainwater; we rely on rainwater harvesting, portable filters, solar distillation, chemical treatments, filtration systems, and even natural coagulants. Together, they guarantee our water’s safe, no matter what nature throws.


